Ribbon Spring CLoud Ribbon是基于HTTP和TCP的负载均衡工具,在微服务开发我们经常使用的Feign也是使用的它。它是以Netflix Ribbon为基础开发的,
准备工作:
在服务提供者中只简单了提供了一个加法功能:
provider 1:1 2 3 4 @GetMapping ("/add" )public String addCompute (@RequestParam Integer a, @RequestParam Integer b) return "我是第一个服务提供者, 答案是: " + (a + b); }
provider 2:
1
2
3
4
@GetMapping ("/add" )public String addCompute (@RequestParam Integer a, @RequestParam Integer b) return "我是第二个服务提供者, 答案是: " + (a + b); }
使用Ribbon实现负载均衡 构建一个Spring boot项目:
1 2 3 4 5 6 7 8 9 10 11 12 13 14 15 16 17 18 19 20 21 22 23 24 25 26 27 28 29 30 31 32 33 34 35 36 37 38 <parent > <groupId > org.springframework.boot</groupId > <artifactId > spring-boot-starter-parent</artifactId > <version > 1.3.5.RELEASE</version > <relativePath /> </parent > <dependencies > <dependency > <groupId > org.springframework.cloud</groupId > <artifactId > spring-cloud-starter-ribbon</artifactId > </dependency > <dependency > <groupId > org.springframework.cloud</groupId > <artifactId > spring-cloud-starter-eureka</artifactId > </dependency > <dependency > <groupId > org.springframework.boot</groupId > <artifactId > spring-boot-starter-web</artifactId > </dependency > <dependency > <groupId > org.springframework.boot</groupId > <artifactId > spring-boot-starter-test</artifactId > <scope > test</scope > </dependency > </dependencies > <dependencyManagement > <dependencies > <dependency > <groupId > org.springframework.cloud</groupId > <artifactId > spring-cloud-dependencies</artifactId > <version > Brixton.RELEASE</version > <type > pom</type > <scope > import</scope > </dependency > </dependencies > </dependencyManagement >
在项目主类,添加@EnableDiscoveryClient来启用服务发现能力。创建RestTemplate的Bean,添加@LoadBalanced注解启用负载均衡功能。
1 2 3 4 5 6 7 8 9 10 11 12 13 14 15 16 17 18 @SpringBootApplication @EnableDiscoveryClient public class ConsumerMovieApplication @Bean @LoadBalanced public RestTemplate restTemplate () return new RestTemplate(); } public static void main (String[] args) SpringApplication.run(ConsumerMovieApplication.class, args); } }
创建ConsumerController,直接使用RestTemplate调用provider:
1
2
3
4
5
6
7
8
@Autowired private RestTemplate restTemplate;@GetMapping ("/add" )public void computeAdd () String addResult = this .restTemplate.getForObject("http://MIRCROSERVICE-PROVIDER-USER/add?a=2&b=3" , String.class); System.out.println(addResult); }
application.yml配置eureka注册中心:
1
2
3
4
5
6
7
8
9
10
11
12
13
server: port: 8010 debug: true spring: application: name: microservice-consumer eureka: instance: prefer-ip-address: true client: service-url: defaultZone: http://localhost:8761/eureka/
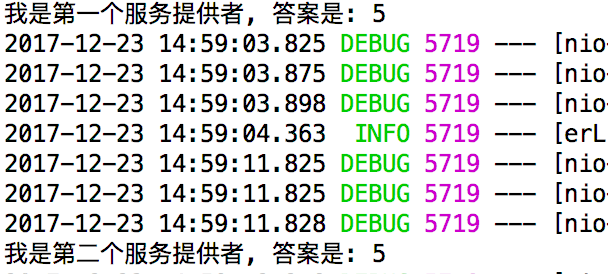
访问两次http://localhost:8010/add,查看日志
我们可以看到两个provider分别被调用了一次,所以通过这些简单的配置和代码已经提供了一个客户端负责均衡的spring boot项目。
但是在实际项目中一般不会直接使用Ribbon,因为我们将URL硬编码到了Controller里,而且可能散落在项目的各个地方,这种方式实在不怎么优雅。所以在实际项目中我们都使用声明式的客户端–Feign。
Feign Feign在RestTemplate的基础上对其进行封装,并且Spring Cloud为Feign增加了对Spring MVC注解的支持,整合了Ribbon和Eureka来实现负载均衡的。
创建一个spring boot 项目:
添加依赖:
1 2 3 4 <dependency > <groupId > org.springframework.cloud</groupId > <artifactId > spring-cloud-starter-feign</artifactId > </dependency >
在项目主类上加上@EnableFeignClients开启Feign Client功能:
1 2 3 4 5 6 7 8 9 10 11 12 @SpringBootApplication @EnableDiscoveryClient @EnableFeignClients public class ConsumerMovieFeignApplication public static void main (String[] args) SpringApplication.run(ConsumerMovieFeignApplication.class, args); } }
创建Feign Client:
1 2 3 4 5 6 7 8 9 @FeignClient (name = "microservice-provider-user" )public interface UserFeignClient @GetMapping ("/add" ) String add (@RequestParam("a" ) Integer a, @RequestParam ("b" ) Integer b) ; }
创建controller:
1 2 3 4 5 6 7 8 9 10 11 12 13 14 15 @RestController public class MovieController @Autowired private UserFeignClient userFeignClient; @GetMapping ("/add" ) public void add () String result = this .userFeignClient.add(2 , 3 ); System.out.println(result); } }
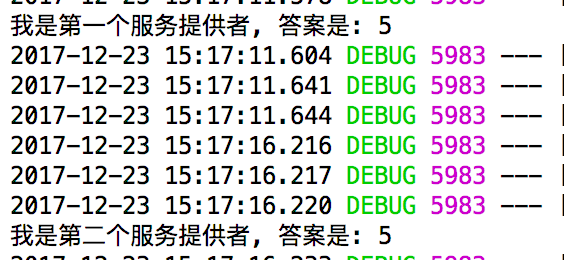
访问两次http://localhost:8011/add,查看日志
我们发现得到了与使用RestTemplate同样的效果,但是大大提高了代码的优雅性,我们可以像调用本地方法一样调用provider,并且同一模块的provider聚合到了一起。
有需要注意的几点:
我们在Feign Client中使用@RequestParam @PathVariable 注解时必须要要指定其value,比如@RequestParam(“userName”),@PathVariable(“id”),这是因为Feign在处理这些注解时和Spring MVC不一样,Feign不会通过反射获取默认的key值。
当使用GET方法和@RequestBody注解共同存在时,Feign会将请求自动转成POST方法,这一点也是需要特别注意的一点。


